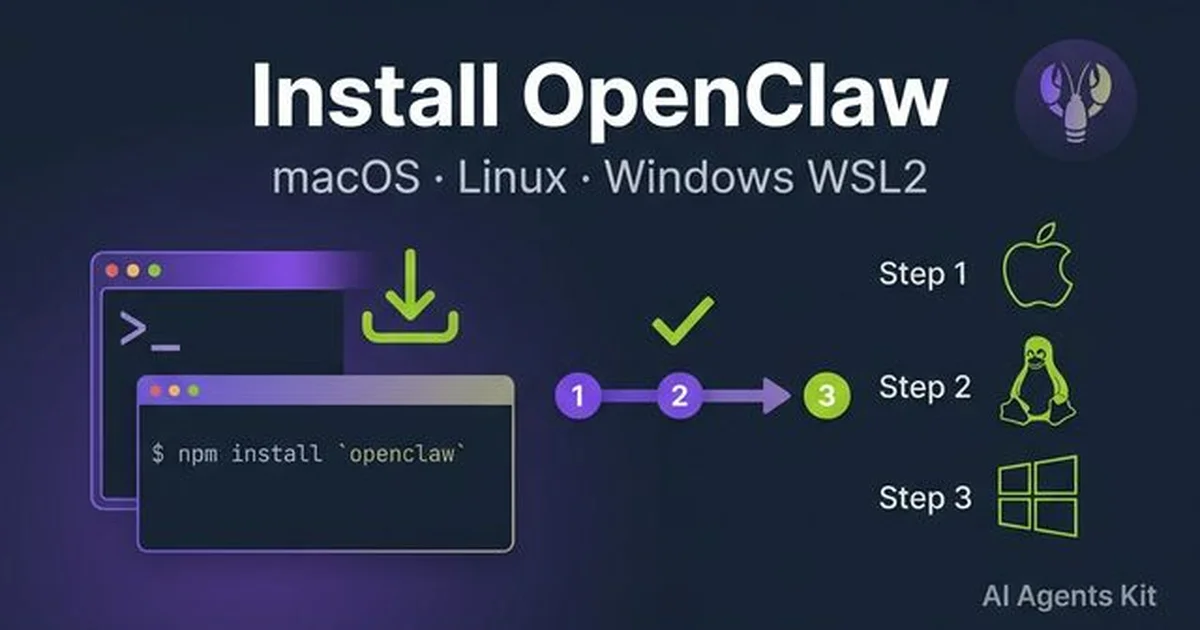
How to Install OpenClaw: The Best Way (All Platforms Guide)
Complete guide to install OpenClaw on every platform — with hosting options and cost breakdown (Hetzner, Oracle Free, Raspberry Pi, Mac mini), WhatsApp/Discord setup, ClawHub skills, and 10 error fixes.
The OpenClaw GitHub repository crossed 100,000 stars in February 2026 — weeks after its public launch — and a significant portion of those new users immediately ran into installation roadblocks. The setup process is genuinely straightforward on macOS and Linux, but Windows users face an extra layer of complexity, and everyone needs to navigate Node.js versioning, API key configuration, and messaging integrations before anything works. Understanding those OpenClaw use cases becomes much easier once the foundation is properly in place.
This guide covers the best way to install OpenClaw across all three supported platforms, with platform-specific commands, post-install configuration steps, and a troubleshooting section that addresses every common failure mode.
The entire process — from zero to a working AI assistant responding in your messaging app — takes under 15 minutes on Linux and macOS, and around 20–25 minutes on Windows with WSL2.
What Is OpenClaw and What Does It Do?
OpenClaw is an open-source personal AI agent that runs directly on a user’s own machine, acting as a gateway between AI models and everyday messaging apps. Unlike cloud-based chatbots that live on remote servers, OpenClaw installs locally — on a Mac, a Linux box, or a Windows machine via WSL2 — and gives the AI full access to the local file system, terminal, and browser.
The agent connects to virtually any large language model: cloud-hosted models from Anthropic (Claude 4), OpenAI (GPT-5), and Google (Gemini 3), or fully local models running through Ollama, including Llama 4, Qwen, Mistral, and DeepSeek. Once running, it accepts commands through WhatsApp, Telegram, Discord, Slack, Signal, or iMessage — depending on which integrations are configured. Understanding what AI agents are helps set expectations: OpenClaw isn’t a chatbot that simply answers questions. It executes actions, manages files, runs scheduled tasks, and orchestrates multi-step workflows autonomously.
The project started as “Clawdbot” in November 2025, briefly became “Moltbot” on January 27, 2026, due to trademark concerns, and officially relaunched as OpenClaw three days later. The version available as of March 2026 is significantly more mature than those early builds, with a polished installer script, an onboarding wizard, and a ClawHub plugin ecosystem. The creator, Peter Steinberger, joined OpenAI in February 2026, and OpenClaw now operates as an independent foundation-backed open-source project.
According to McKinsey’s State of AI research, 72% of organizations now use AI tools as part of their core workflows. OpenClaw sits at the intersection of this adoption wave and the growing demand for privacy-preserving, locally-run AI that doesn’t send sensitive data to external servers.
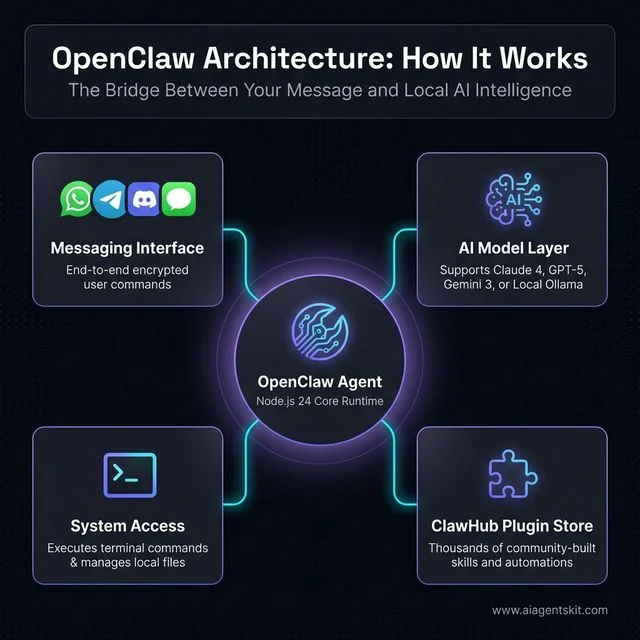
Figure 1: High-level overview of OpenClaw's hub-and-spoke architecture connecting messaging apps to local AI models and system tools.
Is OpenClaw the Right AI Agent? (vs AutoGPT, Manus, and More)
Before spending time on installation, it’s worth confirming OpenClaw is the right tool for the job. Three alternatives dominate conversations about local and autonomous AI agents — AutoGPT, Manus, and OpenManus — and each suits a different type of user.
| Feature | OpenClaw | AutoGPT | Manus | OpenManus |
|---|---|---|---|---|
| Installation | npm one-liner or curl script | Python + git clone + pip | Desktop app download (invite-only) | Conda + git clone + pip |
| Truly local? | ✅ Fully local with Ollama | ⚠️ Local runner, cloud AI | ❌ Cloud-based | ✅ Local option |
| Messaging native? | ✅ WhatsApp, Telegram, Discord, iMessage, Signal | ❌ Terminal only | ❌ Web UI only | ❌ Terminal only |
| Plugin/skill store | ✅ ClawHub (thousands of skills) | ⚠️ Plugin system (limited) | ❌ No public plugin store | ❌ None |
| Cost | Free (+ optional cloud API) | Free (+ OpenAI API costs) | $39–$199/month subscription | Free (+ API costs) |
| Privacy | ✅ Data stays on device | ⚠️ Sends prompts to OpenAI | ❌ Cloud-processed | ✅ Local option |
| Best for | Developers + power users who want messaging-native local AI | Developers building autonomous task pipelines | Non-technical users who want managed AI | Researchers wanting open-source Manus alternative |
Choose OpenClaw if: The priority is a messaging-native AI agent that works through WhatsApp or Telegram, can run fully offline with Ollama, and benefits from a growing plugin ecosystem via ClawHub. It’s the only agent in this comparison that delivers all three simultaneously.
Choose AutoGPT if: The use case is building autonomous software development pipelines where terminal-based interaction is acceptable and OpenAI’s API is already in use.
Choose Manus if: Ease of setup is the top priority and a subscription cost is acceptable. Manus requires no command-line knowledge but surrenders privacy and control.
Choose OpenManus if: The goal is to self-host a Manus-like experience but the team has Python/Conda expertise and doesn’t need messaging integration.
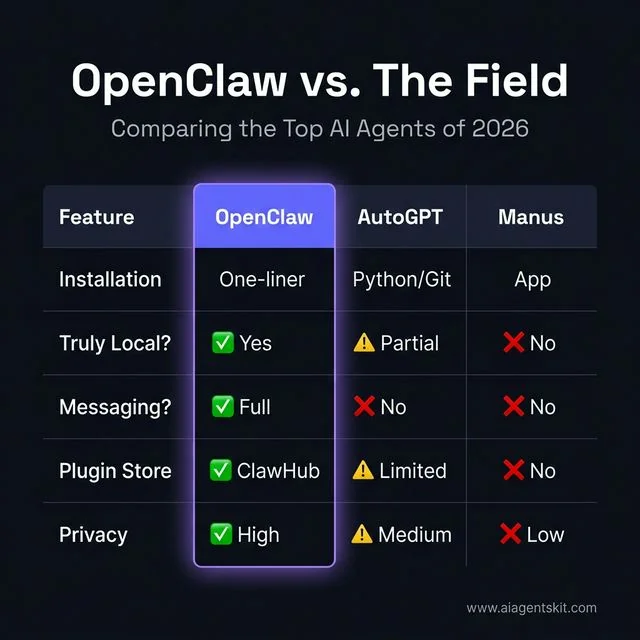
Figure 2: Feature comparison between OpenClaw and other major AI agents in 2026.
For users comparing local AI options more broadly, the guide on best AI tools provides a wider-angle view across the full landscape.
What Are the System Requirements for OpenClaw?
Before running any install commands, confirming that the system meets OpenClaw’s prerequisites prevents the most common failures — specifically Node.js version mismatches and insufficient RAM for local model inference.
OpenClaw is intentionally lightweight as an application. The resource demands depend almost entirely on which AI model runs behind it. Cloud-connected setups (Claude, GPT) need minimal hardware. Local inference via Ollama raises the hardware bar considerably.
| Component | Minimum | Recommended |
|---|---|---|
| Operating System | macOS 12, Ubuntu 20.04, Windows 11 (WSL2) | macOS 14+, Ubuntu 22.04/24.04 |
| Node.js | v22.16+ | v24.x (latest LTS) |
| RAM | 4 GB (cloud models only) | 8 GB+ (for local LLMs via Ollama) |
| Disk Space | 1 GB | 5 GB+ (models, logs, workspace, plugins) |
| CPU | 2-core | 4-core+ |
| GPU | Not required | NVIDIA (CUDA) or Apple Silicon GPU for fast local inference |
| Internet | Required for cloud models | Optional for Ollama-only setups |
Windows users: Native Windows installations are not supported. OpenClaw depends on POSIX-compatible tooling, Unix-based process management, and messaging channel protocols that require a Linux environment. WSL2 provides exactly that, and the experience inside WSL2 is indistinguishable from a native Linux install.
The Node.js requirement deserves extra attention. OpenClaw’s installer script detects the current version and auto-installs Node.js 24 if the system is missing it or running v21 or older. But users who manage Node manually — a common pattern on developer machines — must ensure they meet the v22.16+ minimum. According to the Stack Overflow Developer Survey 2025, Node.js is used by 41.1% of developers globally, which means most technical users likely have it installed — often at an older version that can cause silent failures.
If the goal is to learn how to run AI locally without cloud dependencies, OpenClaw with Ollama is one of the most complete solutions available. The system requirements table above shows that a 4-core CPU with 8 GB RAM handles most 7B-to-8B local models comfortably at usable inference speeds.
Quick prerequisite check (run these before installing):
# Check Node.js version
node --version
# Expected: v22.x or higher (v24.x recommended)

# Check npm version
npm --version
# Expected: 9.x or higher

# Check Git
git --version
# Expected: Any recent version
If Node.js is missing or outdated, install NVM first (covered in the platform-specific sections below). Using NVM rather than system-level Node.js prevents permission errors and makes version switching trivial.
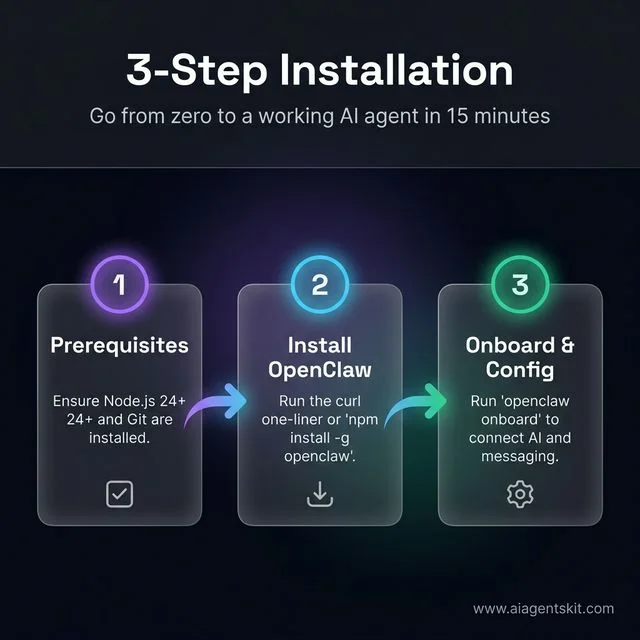
Figure 3: The simple 3-step workflow for getting OpenClaw up and running on any platform.
How to Install OpenClaw on macOS in 5 Steps
macOS is the smoothest path for OpenClaw. Apple Silicon and Intel Macs both work natively, and the installer script handles most of the heavy lifting. Most users find OpenClaw running and connected within 12 minutes on a clean Mac.
Before starting, confirm macOS 12 (Monterey) or later is installed. Open System Settings → General → About to check.
Step 1: Install Node.js via NVM
NVM (Node Version Manager) is strongly preferred over Homebrew or a direct Node installer because it avoids permission issues and allows switching between Node versions without touching the system directories.
# Install NVM
curl -o- https://raw.githubusercontent.com/nvm-sh/nvm/v0.39.7/install.sh | bash

# Reload shell configuration
source ~/.zshrc  # or ~/.bash_profile if using bash

# Verify NVM is available
nvm --version

# Install Node.js 24 (recommended)
nvm install 24
nvm use 24
nvm alias default 24

# Verify
node --version
# Should output: v24.x.x
Step 2: Run the OpenClaw Installer (Recommended Method)
The official one-liner installer handles Node.js detection, OpenClaw installation, and launches an interactive onboarding wizard:
curl -fsSL https://openclaw.ai/install.sh | shThe script checks the Node.js version, installs OpenClaw globally via npm, and prompts for initial configuration. This is the fastest path for users who want the guided setup experience.
Alternative — direct npm install:
npm install -g openclaw@latestThe direct npm method skips the onboarding wizard initially. It’s suitable for users who prefer manual configuration or are installing on servers/headless environments.
Step 3: Run the Onboarding Wizard
openclaw onboard --install-daemonThis command launches an interactive configuration flow that:
- Prompts for an AI model provider (Claude, OpenAI, Gemini, or Ollama)
- Requests an API key for the chosen provider
- Asks which messaging platform to connect
- Installs OpenClaw as a persistent background daemon that starts automatically on login
Step 4: Verify Installation
# Check installed version
openclaw --version

# Confirm the daemon is running
openclaw status
Expected output from openclaw status:
OpenClaw v1.x.x running
Model: claude-4-sonnet
Channels: telegram (connected)
Uptime: 0d 0h 2m
Step 5: Handle macOS Gatekeeper (If Blocked)
First-time OpenClaw launches sometimes trigger a Gatekeeper dialog: “OpenClaw cannot be opened because it is from an unidentified developer.” This happens on systems with strict security settings.
Fix:
# Remove quarantine attribute from the binary
xattr -d com.apple.quarantine $(which openclaw)
Alternatively, right-click the OpenClaw app icon (if applicable) and select Open from the context menu — macOS treats this as explicit user approval.
Where to Host OpenClaw: Every Option With Real Cost Breakdown
OpenClaw needs a machine that stays on 24/7. The installation process is identical across all hosting environments, but the right hosting choice depends on budget, local AI requirements, privacy tolerance, and technical comfort. Below is every viable option, with verified March 2026 pricing.
Option 1: Personal Computer (No Extra Cost)
Monthly cost: ~$0 — uses existing hardware
The simplest path: install OpenClaw on the laptop or desktop already in use. Works immediately. No configuration beyond the standard install.
The catch: the machine must stay on and connected for the agent to respond. Shutting down the laptop overnight means no agent responses until morning. Most users graduate to a dedicated host within a few weeks of regular use.
Best for: Testing, getting started, or users who only need the agent during working hours.
Setup note: Energy consumption depends on the device. A modern M-series MacBook Pro uses ~3–5W idle. An older desktop PC can draw 50–100W idle. At the US average electricity rate of $0.18/kWh (March 2026, per electricchoice.com), a 5W device costs $0.65/month to run 24/7.
Option 2: Raspberry Pi (Ultra-Low Cost, Always-On)
Monthly cost: ~$0.46–$2.00 electricity + hardware ($80–$120 one-time)
A Raspberry Pi 4 (4GB) or Pi 5 (8GB) is purpose-built for always-on, low-power server roles. The Pi 5 draws approximately 3.5W at idle — running 24/7 at the US average electricity rate of $0.18/kWh, that costs roughly $0.46/month in electricity.
| Device | RAM | Idle Power | Est. Monthly Electricity |
|---|---|---|---|
| Raspberry Pi 4 (4GB) | 4 GB | ~3W | ~$0.39 |
| Raspberry Pi 5 (8GB) | 8 GB | ~3.5W | ~$0.46 |
| Raspberry Pi 5 + NVMe hat | 8 GB | ~5W | ~$0.65 |
One-time hardware cost:
- Raspberry Pi 5 (8GB): ~$80
- Official power supply: ~$12
- MicroSD card or NVMe SSD: ~$15–$30
- Case (optional): ~$10–$20
- Total: ~$120–$140
Pros:
- Near-zero monthly ongoing cost
- 100% local — data never leaves the home network
- ARM architecture runs Node.js natively; OpenClaw installs without issues
- Silent, no cooling noise
Cons:
- Cannot run Ollama local LLMs at useful speed (Pi 5 is CPU-only — no GPU acceleration)
- Requires home internet to be reliably on
- Home IP may change (use DuckDNS or Cloudflare Tunnel to get a stable address)
- Physical setup once, then hands-off
Recommended configuration:
# On Raspberry Pi OS Lite (64-bit)
sudo apt update && sudo apt install -y curl git build-essential
# Install NVM, Node 24, OpenClaw — same as Linux section above
# Then configure as systemd service for auto-start on boot
The Pi 5 handles OpenClaw running with cloud models (Claude, GPT-5) comfortably. For local Ollama inference, a Pi 5 can run small 1B–3B parameter models at slow but usable speeds — not suitable for 7B+ models.
Option 3: Mac Mini or Spare Desktop (Great Middle Ground)
Monthly cost: ~$2–$5 electricity — uses existing or second-hand hardware
A Mac mini (M-series) or low-power desktop left running as a home server is the community’s favourite OpenClaw host. The M1/M2/M4 Mac mini uses only 6–10W at idle and under 40W at peak. Running 24/7 at $0.18/kWh:
| Device | Idle Power | Est. Monthly Cost |
|---|---|---|
| Mac mini M4 | ~6W | ~$0.78 |
| Mac mini M2 | ~7W | ~$0.91 |
| Mac mini M1 | ~7W | ~$0.91 |
| Older Intel Mac mini (2018) | ~20W | ~$2.59 |
| Low-power mini PC (Intel N100) | ~10W | ~$1.30 |
Why this is popular: Mac mini M-series chips include a GPU and Apple’s Neural Engine, which means Ollama runs local LLMs with Metal acceleration — dramatically faster than a Pi. A 7B model via Ollama on M1 runs at ~15–25 tokens/second. An 8GB RAM Mac mini handles llama4:8b-scout comfortably; 16GB handles llama4:17b-scout or DeepSeek variants.
Pros:
- Full iMessage integration (macOS-only feature, only works natively on a running Mac)
- GPU-accelerated local LLMs via Ollama Metal backend
- Silent, low power, designed for 24/7 operation
- macOS security features (Gatekeeper, FileVault) intact
Cons:
- Hardware cost if not already owned (~$599–$799 new; ~$300–$500 for M1/M2 second-hand)
- Home internet reliability and potential IP changes (use Cloudflare Tunnel or DDNS)
- Not accessible if home internet goes down
Option 4: Oracle Cloud Free Tier (Free Forever, No Credit Card After Sign-Up)
Monthly cost: $0 — genuinely free, no time limit
Oracle Cloud’s Always Free tier is the only major cloud provider offering a permanently free tier with genuinely useful specs. As of March 2026, the Always Free Ampere ARM allocation allows:
- Up to 4 OCPUs and 24 GB RAM split across up to 4 VM instances
- 200 GB block volume storage
- 10 TB outbound bandwidth per month
- 1 Gbps network bandwidth
For OpenClaw with cloud AI models, a single VM with 2 OCPU and 12 GB RAM (VM.Standard.A1.Flex shape, ARM architecture) handles the workload easily. Node.js 24 runs natively on ARM64.
Pros:
- Zero monthly cost, indefinitely
- 12 GB RAM is generous — can run Ollama with small-to-medium models alongside OpenClaw
- 10 TB bandwidth is effectively unlimited for OpenClaw’s API traffic
- Professional datacenter uptime (~99.9%)
Cons:
- Requires a credit card during sign-up (not charged if staying within Always Free limits — Oracle validates the card but won’t bill without explicit upgrade)
- ARM instances experience “out of capacity” errors in popular regions — provision in less-busy regions (e.g., Sao Paulo, Stockholm, Tokyo)
- Oracle’s free tier ToS prohibits commercial use at scale
- Support is self-service only on the free tier
- No GPU in Always Free tier, so Ollama inference is CPU-only
Quick provision guide:
- Sign up at cloud.oracle.com — choose a less popular region
- Create a VM → Shape: VM.Standard.A1.Flex → 2 OCPU, 12 GB RAM → Ubuntu 22.04
- Follow the Linux install section of this guide exactly
- Configure OpenClaw as a systemd service
Option 5: Cloud VPS — Hetzner, DigitalOcean, Vultr, Linode
Monthly cost: $4–$24/month depending on provider and specs
A cloud VPS is the most common production choice: professional uptime, global data centers, managed networking, and no physical hardware to maintain. All four major entry-level providers work well with OpenClaw.
Verified March 2026 Pricing (Cloud AI models only, no Ollama)
For running OpenClaw with cloud AI models (Claude, GPT-5), a 2 GB RAM VPS is the minimum viable spec:
| Provider | Plan | vCPU | RAM | Storage | Bandwidth | Monthly Cost |
|---|---|---|---|---|---|---|
| Hetzner (EU) | CX22 | 2 | 4 GB | 40 GB SSD | 20 TB | €4.49/mo (~$4.90) |
| Hetzner (US) | CPX11 | 2 | 2 GB | 40 GB SSD | 1 TB | $6.99/mo |
| DigitalOcean | Basic | 1 | 1 GB | 25 GB SSD | 1 TB | $6/mo |
| DigitalOcean | Basic | 2 | 2 GB | 60 GB SSD | 3 TB | $12/mo |
| Vultr | Regular | 1 | 2 GB | 55 GB SSD | 2 TB | $10/mo |
| Linode (Akamai) | Shared | 1 | 2 GB | 50 GB SSD | 2 TB | $10/mo |
Prices verified March 2026. Hetzner prices reflect April 2026 increases. Always confirm current pricing on provider websites before ordering.
For Ollama + OpenClaw on the Same VPS (Local LLMs)
Running Ollama alongside OpenClaw requires significantly more RAM. A llama4:8b-scout model needs ~6 GB RAM for inference, so the host needs at least 8 GB RAM total:
| Provider | Plan | vCPU | RAM | Storage | Monthly Cost |
|---|---|---|---|---|---|
| Hetzner (EU) | CX32 | 4 | 8 GB | 80 GB SSD | ~€8.99/mo (~$9.80) |
| Hetzner (US) | CPX31 | 4 | 8 GB | 160 GB SSD | ~$14.99/mo |
| DigitalOcean | Basic | 4 | 8 GB | 160 GB SSD | $48/mo |
| Vultr | High-Performance | 4 | 8 GB | 200 GB NVMe | $48/mo |
Hetzner recommendation: For most users, Hetzner’s European data centers offer the best price-to-performance ratio globally. The CX22 (4 GB RAM, €4.49/mo) is the recommended minimum for OpenClaw with cloud AI models. If Ollama is needed, the CX32 (8 GB RAM) remains under €9/month.
DigitalOcean recommendation: More expensive than Hetzner but offers superior developer experience, a clean UI, and one-click app deployments. Good choice for teams already on DigitalOcean.
Vultr recommendation: Competitive pricing, global edge locations, and strong NVMe SSD performance. The Regular 2 GB plan at $10/mo is a solid DigitalOcean alternative with more bandwidth.
Linode (Akamai) recommendation: Same pricing tier as Vultr. Akamai’s acquisition has improved edge caching but core VPS pricing and specs have stayed consistent.
Option 6: Dedicated Bare-Metal Server (High-Performance Local AI)
Monthly cost: $40–$150+/month
For users who need to run large local LLMs (30B+ parameter models like Mixtral or Llama 4 Scout 109B), a bare-metal dedicated server with a GPU is the only cloud option that avoids the per-token API cost ceiling.
This is a niche choice. Most OpenClaw users are better served by a CX32 on Hetzner with cloud AI. Dedicated servers are relevant for:
- Running 30B+ models at acceptable speeds (requires GPU: RTX 4090, A100, or H100)
- High-volume autonomous workflows where cloud API costs become significant at scale
- Teams deploying shared OpenClaw instances for multiple users
| Provider | Server | GPU | RAM | Monthly Cost |
|---|---|---|---|---|
| Hetzner | AX41-NVMe | None | 64 GB | €39/mo |
| Hetzner | GPU Server | NVIDIA RTX 4000 Ada | 64 GB | €169/mo |
| Vultr | Bare Metal | None | 64 GB | $120/mo |
| Lambda Labs | GPU Cloud | A10 (24GB VRAM) | 60 GB | $75/mo (on-demand) |
For most readers of this guide, dedicated servers are overkill. The sweet spot remains a Hetzner CX22 or CX32 VPS.
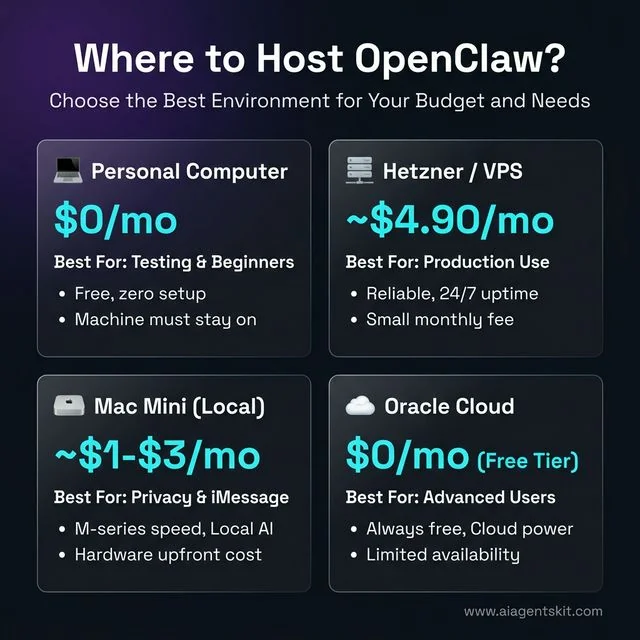
Figure 4: Choosing the right hosting environment for OpenClaw based on your specific requirements and budget.
Hosting Decision Guide: Which Option Is Right?
| Use Case | Recommended Host | Monthly Cost |
|---|---|---|
| Just testing, getting started | Personal computer | $0 |
| Privacy-first, no cloud data | Mac mini M-series at home | ~$1–$3 |
| Ultra-low cost, always-on, cloud AI only | Oracle Always Free tier | $0 |
| Best value cloud, cloud AI | Hetzner CX22 | ~$4.90 |
| Cloud + Ollama local LLMs | Hetzner CX32 | ~$9.80 |
| iMessage integration required | Mac (home or Mac mini) | ~$1–$3 |
| Low DIY, solid reliability | DigitalOcean Basic $12 | $12 |
| Maximum local AI performance | Mac mini M4 Pro 24GB | ~$1–$2 |
| Large-scale team deployment | Dedicated GPU server | $75–$170+ |
3 Other Ways to Install OpenClaw: Docker, fnm, and PowerShell
The official installer script covers most users, but three alternative installation paths are worth knowing: Docker for isolated server deployments, fnm as a faster NVM alternative, and a native Windows PowerShell path.
Option 1: Install via Docker (Best for Servers and CI Environments)
Docker provides a clean, isolated OpenClaw environment without touching the host system’s Node.js installation. It’s particularly well-suited for VPS deployments where running multiple services in containers is already the norm.
# Pull the latest official image
docker pull openclaw/openclaw:latest

# Run with environment variables
docker run -d \
  --name openclaw \
  --restart unless-stopped \
  -e ANTHROPIC_API_KEY=your-key-here \
  -e TELEGRAM_BOT_TOKEN=your-token-here \
  -e TELEGRAM_CHAT_ID=your-chat-id \
  -v ~/.openclaw:/root/.openclaw \
  openclaw/openclaw:latest
The -v ~/.openclaw:/root/.openclaw flag mounts the local config directory into the container, so configuration survives container restarts and image updates.
Check container status:
docker ps
docker logs openclaw --tail 50
Option 2: Install Node.js via fnm (Faster Alternative to NVM)
fnm (Fast Node Manager) is a Rust-based Node version manager that benchmarks 35× faster than NVM for installs and works natively on Windows without WSL. The official OpenClaw documentation now lists it alongside NVM as a supported path.
# macOS / Linux — install fnm
curl -fsSL https://fnm.vercel.app/install | bash

# Reload shell
source ~/.bashrc  # or ~/.zshrc on macOS

# Install and use Node 24
fnm install 24
fnm use 24
fnm default 24

# Verify
node --version  # v24.x.x

# Then install OpenClaw as normal
npm install -g openclaw@latest
On Windows (without WSL), fnm installs via winget:
winget install Schniz.fnmThen restart PowerShell and run fnm install 24 && fnm use 24.
Option 3: Windows PowerShell Installer (Limited Feature Set)
For Windows users who cannot enable WSL2 due to IT policy restrictions, Microsoft provides a PowerShell-based installer. Run PowerShell as Administrator:
iwr -useb https://openclaw.ai/install.ps1 | iexThis installs a Windows-native build of OpenClaw that covers core functionality: Telegram, Discord, and most cloud AI models. The limitations compared to the WSL2 path are: no iMessage support (macOS only), reduced filesystem access, and some ClawHub skills that rely on Unix tools will not run. For full feature parity on Windows, WSL2 remains the recommended path.
How to Install OpenClaw on Linux (Ubuntu/Debian)
Linux installation is nearly identical to macOS in terms of steps but requires a few distro-specific prerequisites. The instructions below are optimized for Ubuntu and Debian-based systems, which are the most common choices for OpenClaw deployments.
Memory is one area where OpenClaw’s agent architecture differs from traditional software. Unlike stateless apps, OpenClaw maintains context across sessions. This persistent context is what makes OpenClaw feel like an ongoing collaboration rather than a series of disconnected requests — a key architectural distinction from standard chatbots. Configuration files for the Linux server deployment live in ~/.openclaw/ by default.
Step 1: Install System Prerequisites
# Update package lists and install essentials
sudo apt update && sudo apt install -y curl git build-essential

# Verify
curl --version
git --version
Step 2: Install NVM and Node.js 24
# Install NVM
curl -o- https://raw.githubusercontent.com/nvm-sh/nvm/v0.39.7/install.sh | bash

# Reload shell
source ~/.bashrc

# Install Node.js 24
nvm install 24
nvm use 24
nvm alias default 24

# Verify
node --version   # v24.x.x
npm --version    # 10.x or higher
Step 3: Install OpenClaw
# Method 1: Official installer (recommended)
curl -fsSL https://openclaw.ai/install.sh | sh

# Method 2: Direct npm install
npm install -g openclaw@latest
Step 4: Run Onboarding and Start the Daemon
openclaw onboard --install-daemonStep 5: Configure as a systemd Service (Optional, for Headless/Server Deployments)
For Linux servers where the user wants OpenClaw to survive reboots without a logged-in session, creating a systemd service is more reliable than the default daemon:
# Create a systemd service file
sudo nano /etc/systemd/system/openclaw.service
Paste this configuration:
[Unit]
Description=OpenClaw AI Agent Daemon
After=network.target

[Service]
Type=simple
User=your_username
ExecStart=/home/your_username/.nvm/versions/node/v24.x.x/bin/openclaw start
Restart=always
RestartSec=5
Environment="NODE_ENV=production"

[Install]
WantedBy=multi-user.target
Enable and start:
sudo systemctl daemon-reload
sudo systemctl enable openclaw
sudo systemctl start openclaw
sudo systemctl status openclaw
How to Install OpenClaw on Windows Using WSL2
Windows installation requires WSL2 as an intermediate layer. This adds approximately 10 minutes to the total setup time but results in a rock-solid, Linux-native OpenClaw environment inside Windows. The extra steps are worth it — native Windows is not supported, and attempts to run OpenClaw directly on Windows PowerShell or Command Prompt will fail.
OpenClaw’s reliance on POSIX environments explains something important about the difference between agents and chatbots: true AI agents like OpenClaw need system-level access that Windows’ native environment doesn’t provide in the same form as Unix systems. Microsoft’s official WSL documentation describes how WSL2 runs a full Linux kernel through a lightweight utility VM, delivering near-native Linux performance on Windows hardware.
Enabling WSL2 and Installing Ubuntu
Step 1: Open PowerShell as Administrator
Right-click the Start button → Windows PowerShell (Admin) or Terminal (Admin).
Step 2: Install WSL2
wsl --installThis single command enables the WSL2 feature, installs the Linux kernel, and downloads Ubuntu 24.04 LTS as the default distribution. The process takes 3–5 minutes depending on internet speed.
Step 3: Restart the Computer
After the command completes, Windows prompts for a restart. Restart to finalize the WSL2 kernel installation.
Step 4: Complete Ubuntu Initial Setup
After restarting, an Ubuntu terminal window opens automatically. Set a Unix username and password when prompted. These credentials are separate from the Windows login.
Step 5: Verify WSL2 Is Running
Back in PowerShell:
wsl --version
wsl -l -v
The output should show Ubuntu running on WSL Version 2 (not Version 1).
Installing Node.js Inside WSL2
Inside the Ubuntu terminal (not PowerShell):
# Update Ubuntu packages
sudo apt update && sudo apt upgrade -y

# Install prerequisites
sudo apt install -y curl git build-essential

# Install NVM
curl -o- https://raw.githubusercontent.com/nvm-sh/nvm/v0.39.7/install.sh | bash

# Reload shell
source ~/.bashrc

# Install Node.js 24
nvm install 24
nvm use 24
nvm alias default 24

# Install OpenClaw
npm install -g openclaw@latest

# Run onboarding
openclaw onboard --install-daemon
Common WSL2 Issues and Quick Fixes
Issue: DNS resolution failures inside WSL2
Symptoms: npm ERR! network request failed, curl: (6) Could not resolve host
Fix:
# Remove auto-generated resolv.conf
sudo rm /etc/resolv.conf

# Set public DNS manually
sudo bash -c 'echo "nameserver 8.8.8.8" > /etc/resolv.conf'
sudo bash -c 'echo "nameserver 1.1.1.1" >> /etc/resolv.conf'

# Prevent WSL from overwriting it
sudo bash -c 'echo "[network]" >> /etc/wsl.conf'
sudo bash -c 'echo "generateResolvConf = false" >> /etc/wsl.conf'
Issue: Slow filesystem performance
Store project files inside the WSL filesystem (~/openclaw-data/), not on the mounted Windows drive (/mnt/c/). Access to mounted Windows drives is significantly slower due to cross-filesystem architecture.
Issue: wsl --install fails on older Windows versions
Windows 11 supports wsl --install natively. On Windows 10 (version 2004+), the command works but may require enabling virtualization in BIOS first. Check BIOS settings for “Intel VT-x” or “AMD-V” virtualization and ensure it’s enabled.
Connecting OpenClaw to an AI Model and Messaging App
A fresh OpenClaw installation without a configured AI model and messaging channel does nothing useful. The onboarding wizard covers the basics, but users who want more control — or who skipped the wizard — need to configure these manually via the .env file.
At its core, OpenClaw functions as an AI gateway. Both pieces are required simultaneously — a capable AI model for reasoning and a communication channel for receiving instructions. Without both, the agent simply doesn’t activate. The configuration process is straightforward: one section of the .env file points to the AI model, another section credentials the messaging platform.
Setting Up a Telegram Bot for OpenClaw
Telegram is the recommended first integration because BotFather (Telegram’s official bot creation tool) is free, takes under 2 minutes, and requires no business account verification.
Step 1: Create a Telegram Bot
- Open Telegram and search for
@BotFather - Send
/newbot - Follow prompts to name the bot and set a username (must end in “bot”)
- BotFather returns an API token like:
7312654890:AAF3kLl...
Step 2: Get Your Chat ID
- Search for
@userinfobotin Telegram - Send any message — it returns your numeric user ID: e.g.,
123456789
Step 3: Configure OpenClaw’s .env File
# Navigate to OpenClaw's config directory
cd ~/.openclaw

# Create or edit .env
nano .env
Add these variables:
# AI Model Configuration
OPENCLAW_MODEL=claude-4-sonnet
ANTHROPIC_API_KEY=sk-ant-your-key-here

# Telegram Integration
TELEGRAM_BOT_TOKEN=7312654890:AAF3kLl...
TELEGRAM_CHAT_ID=123456789
Step 4: Restart OpenClaw
openclaw restartSend a test message to the bot in Telegram. Within seconds, OpenClaw should respond with a greeting.
Using Ollama for a Fully Offline Setup
For setups that require zero internet access — air-gapped environments, maximum privacy, or simply eliminating cloud API costs — pairing OpenClaw with Ollama allows all inference to run on local hardware.
# Install Ollama
curl -fsSL https://ollama.ai/install.sh | sh

# Pull a capable local model (requires ~6 GB RAM)
ollama pull llama4:8b-scout

# Verify Ollama is running
ollama serve &
ollama list
Configure OpenClaw to use Ollama:
# Local Ollama setup — no API key needed
OPENCLAW_MODEL=ollama/llama4:8b-scout
OPENCLAW_BASE_URL=http://localhost:11434
Restart the agent:
openclaw restartThe experience is identical to cloud mode — same Telegram interface, same skill syntax — except every token is processed locally. According to the official OpenClaw documentation, the agent supports hot model switching, meaning it can route complex tasks to a cloud model and simple tasks to a local model without reconfiguration.
For users on Apple Silicon Macs, Ollama uses the Metal GPU backend natively, delivering substantially faster inference than Intel-based Macs. On Linux with an NVIDIA GPU and CUDA drivers installed, Ollama automatically uses GPU acceleration — delivering performance comparable to mid-range cloud inference at zero marginal cost.
Connecting OpenClaw to WhatsApp, Discord, and iMessage
Telegram is the simplest first integration, but many users prefer WhatsApp (for existing contacts), Discord (for team deployments), or iMessage (for native macOS experience). Each platform requires a slightly different auth approach, but the configuration pattern is the same: credentials go into ~/.openclaw/.env, then openclaw restart.
How to Connect OpenClaw to WhatsApp
OpenClaw connects to WhatsApp via WhatsApp Web’s multi-device session — no WhatsApp Business account or API approval is required for personal use.
Step 1: Trigger the WhatsApp pairing flow
openclaw configure --channel whatsappA QR code appears in the terminal. Open WhatsApp on the phone → Settings → Linked Devices → Link a Device and scan it. The session persists across restarts via a session file stored in ~/.openclaw/sessions/.
Step 2: Add access control to .env
By default, OpenClaw rejects WhatsApp DMs from unknown numbers. Configure who can send commands:
# WhatsApp access policy
WHATSAPP_DM_POLICY=allowlist
WHATSAPP_ALLOW_FROM=+919876543210,+14155551234
Set WHATSAPP_DM_POLICY=open to allow commands from any number (not recommended outside secured environments).
Step 3: Restart and test
openclaw restartSend a WhatsApp message from an allowlisted number: hello. OpenClaw should reply within 2–3 seconds.
Session tip: The WhatsApp session automatically re-authenticates if the phone loses connection briefly. However, if WhatsApp logs out Linked Devices (usually after 14 days of phone offline), re-run
openclaw configure --channel whatsappto re-scan.
How to Connect OpenClaw to Discord
Discord integration suits team deployments where multiple people share an AI assistant via a server channel. OpenClaw acts as a Discord bot responding only in designated channels.
Step 1: Create a Discord Application and Bot
- Go to discord.com/developers/applications and click New Application
- Name it (e.g., “OpenClaw Assistant”) → Save
- Navigate to Bot → Add Bot → Yes, do it!
- Under Token, click Copy — this is the
DISCORD_BOT_TOKEN - Under Privileged Gateway Intents, enable Message Content Intent
Step 2: Invite the bot to a server
Navigate to OAuth2 → URL Generator. Select bot scope, then permissions: Send Messages, Read Message History, View Channels. Copy the generated URL and open it in a browser to invite the bot.
Step 3: Get the target channel ID
In Discord, enable Developer Mode (Settings → Advanced → Developer Mode). Right-click the target channel → Copy Channel ID.
Step 4: Add to .env
# Discord Integration
DISCORD_BOT_TOKEN=MTMwNjkx...your-token
DISCORD_CHANNEL_ID=1234567890123456789
Restart: openclaw restart. The bot appears online in Discord and responds to messages in the configured channel.
How to Connect OpenClaw to iMessage (macOS Only)
iMessage integration uses AppleScript to send and receive messages through the macOS Messages app — no API tokens or third-party accounts needed. Data stays entirely local.
Requirements: macOS 12+, iMessage signed in to an Apple ID, Accessibility permissions granted to Terminal.
Step 1: Grant Accessibility permissions
System Settings → Privacy & Security → Accessibility → Add Terminal (or iTerm2). This allows OpenClaw’s AppleScript bridge to control Messages.
Step 2: Configure in .env
# iMessage Integration
IMESSAGE_ENABLED=true
IMESSAGE_ALLOWED_SENDERS=+14155551234,user@example.com
Senders can be phone numbers or Apple IDs (email addresses). Leave IMESSAGE_ALLOWED_SENDERS empty to accept from any contact — fine for personal single-user setups.
Step 3: Restart and test
openclaw restartiMessage iMessage from an allowed sender to the Mac’s phone number or Apple ID email. OpenClaw replies via Messages automatically.
Privacy note: iMessage end-to-end encryption applies to the transmission. OpenClaw processes messages locally — they never leave the Mac.
How to Install Skills from ClawHub (OpenClaw’s Plugin Store)
Out of the box, OpenClaw handles file management, web browsing, terminal execution, and scheduling. ClawHub extends this with community-built skills covering everything from PostgreSQL backup automation to Google Calendar sync to GitHub PR review. It functions like npm for OpenClaw capabilities.
Install the ClawHub CLI
npm install -g clawhub@latest

# Verify
clawhub --version
Find and Install Skills
# Search the skill registry
clawhub search "calendar"
clawhub search "postgres"
clawhub search "email summary"

# Install a skill by its slug
clawhub install username/skill-name

# Example: install a PostgreSQL backup skill
clawhub install dbalve/postgres-backup

# List installed skills
clawhub list

# Update all skills
clawhub update --all
Installed skills live in ~/.openclaw/workspace/skills/ and are immediately available after OpenClaw restarts. No restart is required in most cases — skills hot-load.
Security: Always Review Before Installing
ClawHub skills execute code with OpenClaw’s full system permissions. Before installing any community skill, review its SKILL.md file:
# Preview skill contents before installing
clawhub show username/skill-name
Look for the signature field in the YAML frontmatter — signed skills have been cryptographically verified by the ClawHub team. Unsigned skills from unknown authors carry higher risk and should be inspected carefully.
Create a Custom Workspace Skill
For automations not available on ClawHub, custom skills are straightforward to write. Create a file at ~/.openclaw/workspace/skills/my-skill.md:
---
name: daily-standup
description: Posts a structured daily standup summary to Telegram at 9am
triggers:
  - schedule: "0 9 * * 1-5"  # Weekdays at 9am
  - phrase: "standup"
---

Collect status from the following sources and compose a standup:
- Check ~/projects/ for any modified files in the last 24 hours
- Fetch the top 3 items from JIRA project PROJ via the JIRA API
- Summarize yesterday's git commits across all repos in ~/code/

Format: brief bullet points — three sections: Done / Today / Blockers
OpenClaw reads the natural language instructions and executes them using the available tools. No code required. The skill activates on the 0 9 * * 1-5 cron schedule and also whenever “standup” appears in a message.
OpenClaw Configuration: config.yaml Settings and the Dashboard
Most OpenClaw configuration lives in two files: ~/.openclaw/.env for secrets (API keys, tokens) and ~/.openclaw/config.yaml for behavioral settings. Understanding their roles prevents the common mistake of putting everything in .env.
Key config.yaml Settings
# Open config.yaml
nano ~/.openclaw/config.yaml
# ~/.openclaw/config.yaml
# Default AI model (overrides .env when set)
defaultModel: claude-4-sonnet
# Routed model for simple tasks (saves API costs)
lightModel: ollama/llama4:8b-scout
# Gateway (local web server OpenClaw runs)
gateway:
port: 18789 # Change if port conflicts occur
host: 127.0.0.1 # Use 0.0.0.0 to expose on LAN
# Persistent memory
memory:
enabled: true # Set false to disable cross-session memory
maxEntries: 1000 # Prune oldest entries beyond this
# Logging
log:
level: info # debug | info | warn | error
rotation: daily # Prevents logs from consuming all disk
maxFiles: 7 # Keep 7 days of logs
# Skills auto-update
clawhub:
autoUpdate: false # Set true to update skills on startupUsing the Interactive Config Editor
For users who prefer not to edit YAML directly:
openclaw configureThis launches an interactive prompt with the most common settings: default model, messaging channels, gateway port, and log level. Changes take effect on the next openclaw restart.
The OpenClaw Dashboard
OpenClaw runs a local web interface accessible at http://127.0.0.1:18789/ while the gateway is running. Open it from the terminal:
openclaw dashboardThe dashboard shows:
- Agent status — uptime, current model, active channels
- Recent tasks — a log of the last 50 executed tasks with success/failure indicators
- Installed skills — with enable/disable toggles
- Memory viewer — browse and search the agent’s persistent memory entries
- Live logs — tail the log stream in a browser tab
The dashboard is read-mostly. Configuration changes still require editing files or running openclaw configure, but it’s the fastest way to confirm the agent is healthy and see what it’s been doing.
Hot Model Switching
OpenClaw supports per-message model overrides, useful when a task needs a specific capability:
# In Telegram or WhatsApp:
[use gpt-5-turbo] Write a detailed technical spec for a REST API
[use ollama/deepseek-coder] Review this Python function and suggest improvements
The bracket syntax temporarily overrides defaultModel for that single message. The agent reverts to the default for subsequent messages.
Using openclaw doctor to Diagnose Installation Problems
Before manually digging through logs, run the built-in diagnostic first. openclaw doctor checks every layer of the stack in a single command and reports exactly what’s broken.
openclaw doctorExample output:
✅ Node.js v24.2.0 — OK
✅ openclaw v1.8.3 — OK
✅ Daemon — running (PID 3847)
✅ Gateway — reachable at http://127.0.0.1:18789
✅ AI Model — claude-4-sonnet responding (latency: 412ms)
⚠️  Telegram — TELEGRAM_CHAT_ID not set in .env
❌ Ollama — connection refused at localhost:11434
Each line maps directly to a config fix. The example above shows Ollama isn’t running — ollama serve & resolves it.
Checking the Gateway Specifically
openclaw gateway statusThis verifies the local HTTP gateway (default port 18789) is reachable. A DOWN status when the daemon shows running usually means a port conflict — another service is already using 18789. Change the port in config.yaml under gateway.port and restart.
Post-Upgrade Configuration Check
After running npm install -g openclaw@latest, run:
openclaw doctor --configThis variant additionally checks whether the current .env and config.yaml files are compatible with the new version. Breaking changes between major versions — such as renamed environment variables — show up here before they cause runtime failures.
Reading the Logs
# Live tail
openclaw logs --follow

# Last 100 lines
openclaw logs --tail 100

# Filter by level
openclaw logs --level error

# Logs are also stored at:
cat ~/.openclaw/logs/openclaw.log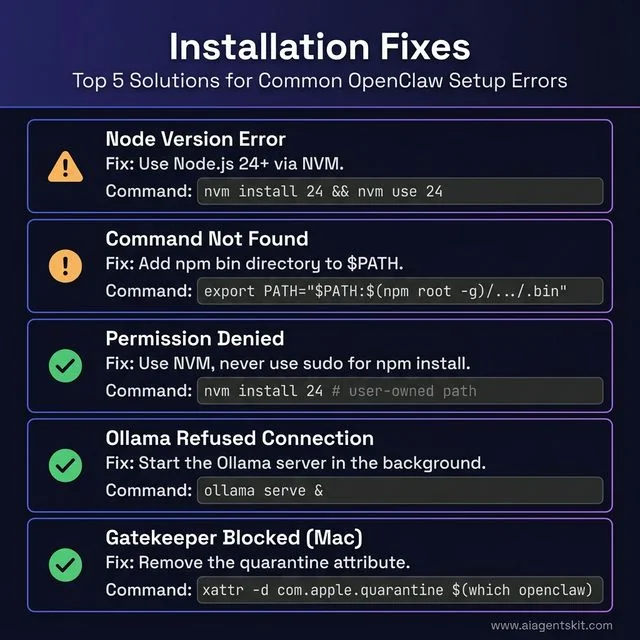
Figure 5: Quick-reference troubleshooting guide for the most common OpenClaw installation errors.
10 Common OpenClaw Installation Errors and How to Fix Them
Most OpenClaw installation failures fall into a predictable set of categories. Resolving them rarely requires deep technical knowledge — the fixes are usually one or two commands. For those who want to go further and build an AI agent from scratch using Python, these troubleshooting fundamentals transfer directly.
Error 1: node: version not supported
Cause: Node.js version is below v22.16.
Fix:
# Check current version
node --version

# If using NVM
nvm install 24
nvm use 24

# Verify
node --version   # should show v24.x.x
Error 2: EACCES: permission denied, mkdir
Cause: OpenClaw is trying to write to a directory owned by root (common when Node.js was installed via apt or a system-level installer, not NVM).
Fix: Reinstall Node.js using NVM instead of the system installer. NVM stores everything in the user’s home directory and avoids root permission conflicts entirely.
# Install NVM (if not already installed)
curl -o- https://raw.githubusercontent.com/nvm-sh/nvm/v0.39.7/install.sh | bash
source ~/.bashrc

# Install Node 24 via NVM
nvm install 24
nvm use 24

# Reinstall openclaw (now under NVM's user-owned paths)
npm install -g openclaw@latest
Never use sudo npm install -g — this patches over the permission problem without fixing the root cause and introduces security risks.
Error 3: openclaw: command not found
Cause: The npm global bin directory is not in the system $PATH.
Fix:
# Add npm global bin to PATH
export PATH="$PATH:$(npm root -g)/../.bin"

# Make it permanent (for bash)
echo 'export PATH="$PATH:$(npm root -g)/../.bin"' >> ~/.bashrc
source ~/.bashrc

# For zsh (macOS default)
echo 'export PATH="$PATH:$(npm root -g)/../.bin"' >> ~/.zshrc
source ~/.zshrc
Error 4: Installation Hangs at npm install
Cause: Usually a slow or rate-limited npm registry connection, or a corrupted npm cache.
Fix:
# Clear npm cache
npm cache clean --force

# Retry install
npm install -g openclaw@latest
If that doesn’t work:
# Switch to a regional npm mirror
npm install -g openclaw@latest --registry https://registry.npmmirror.com
Error 5: macOS Gatekeeper Blocks Execution
Cause: macOS security preventing execution of unsigned binaries.
Fix:
xattr -d com.apple.quarantine $(which openclaw)Error 6: WSL2 DNS Resolution Fails During npm Install
Cause: WSL2’s auto-generated /etc/resolv.conf points to a Windows DNS resolver that can timeout.
Fix: (covered in the Windows section above — repeat the resolv.conf fix)
Error 7: Telegram Bot Doesn’t Respond After Setup
Cause: Incorrect TELEGRAM_BOT_TOKEN, misconfigured TELEGRAM_CHAT_ID, or OpenClaw daemon not running.
Fix:
- Double-check the bot token in
.env— no extra spaces or missing characters - Verify the chat ID by messaging
@userinfobot - Check OpenClaw status:
openclaw status - If the daemon is stopped:
openclaw start - View logs for errors:
openclaw logs --tail 50
Error 8: Ollama Connection Refused
Cause: Ollama is not running when OpenClaw tries to connect.
Fix:
# Start Ollama in the background
ollama serve &

# Verify it's running
curl http://localhost:11434/api/version
To make Ollama start automatically on boot (Linux):
sudo systemctl enable ollama
sudo systemctl start ollama
Error 9: sharp Build Failure on macOS (node-gyp Error)
Cause: The sharp image-processing dependency fails to compile on macOS when using Node.js 22+ with certain Xcode command-line tools configurations.
Symptoms: The npm install log shows gyp ERR! build error referencing sharp or libvips.
Fix:
# Ensure Xcode CLI tools are current
xcode-select --install

# Clear npm cache and rebuild
npm cache clean --force
npm install -g openclaw@latest --ignore-scripts
The --ignore-scripts flag skips the native build step. OpenClaw functions normally without the sharp binary — it’s used only for image thumbnail generation in certain ClawHub skills. If a skill specifically requires image processing, install sharp separately after setting the correct build environment:
npm install -g sharp --ignore-enginesError 10: OpenClaw Gateway Shows DOWN
Cause: Another process is already occupying port 18789 (the default OpenClaw gateway port).
Diagnose:
# Find what's using the port
lsof -i :18789
Fix — change the gateway port:
# Edit config.yaml
nano ~/.openclaw/config.yaml
Set gateway.port: 18800 (or any free port above 1024), then:
openclaw restart
openclaw gateway status
The dashboard URL updates to the new port: http://127.0.0.1:18800/.
OpenClaw Installation: Frequently Asked Questions
What Node.js version is required for OpenClaw?
OpenClaw requires Node.js version 22.16 or newer, with version 24 recommended as the preferred runtime. The official installer script automatically checks the existing Node.js version and installs Node.js 24 if the system is below the minimum threshold. Users managing Node.js manually via NVM should run nvm install 24 && nvm use 24 before installing. The installer explicitly validates the version and exits with a descriptive error message if the minimum isn’t met, so there’s no ambiguity.
Can OpenClaw run on Windows without WSL2?
No. Native Windows installation is not supported. OpenClaw relies on POSIX-compatible system calls, Unix-based process management, and certain messaging channel protocols (particularly iMessage and WhatsApp Web) that require a Linux environment. Windows Subsystem for Linux 2 (WSL2) provides that environment seamlessly, and the resulting experience inside WSL2 is functionally identical to running on native Ubuntu. Windows users attempting to skip WSL2 will encounter errors during npm install or at runtime that cannot be resolved without it.
How do I update OpenClaw to the latest version?
npm install -g openclaw@latestThis command upgrades OpenClaw in place, preserving all existing configuration files in ~/.openclaw/. After upgrading, restart the daemon:
openclaw restartCheck the release notes at openclaw.ai/changelog before major version upgrades, as breaking changes occasionally require changes to the .env file or YAML skill configurations.
Can I install OpenClaw on a VPS or cloud server?
Yes, and this is a popular deployment pattern. Any Linux VPS (Ubuntu 22.04 or 24.04 recommended) with at least 2 GB RAM supports OpenClaw with cloud AI models. The installation process is identical to the local Linux instructions above. After installing, configuring OpenClaw as a systemd service (covered in the Linux section) ensures it survives server reboots. Running on a VPS eliminates the “always-on machine” requirement — there’s no need for a home computer to be running 24/7 for the agent to stay available.
Does OpenClaw work with Ollama for local AI models?
Yes — Ollama integration is fully supported and is one of OpenClaw’s most popular configurations. Set OPENCLAW_MODEL=ollama/model-name and OPENCLAW_BASE_URL=http://localhost:11434 in the .env file, and OpenClaw routes all inference to the local Ollama server. This enables completely offline operation with zero API costs. The supported Ollama models for general-purpose use include llama4:8b-scout (6 GB RAM), mistral:7b (5 GB RAM), and qwen3.5-coder:14b (10 GB RAM) for coding-specific workflows.
What is the difference between openclaw start and openclaw onboard?
openclaw onboard is a one-time interactive wizard that collects configuration information (AI model, API keys, messaging platform) and writes the .env file. The --install-daemon flag additionally registers OpenClaw as a background process that starts automatically. This command runs once during initial setup. openclaw start is the runtime command that launches the agent using the existing .env configuration. On subsequent reboots, the daemon handles this automatically. If the daemon is configured, users rarely need to run openclaw start manually — it’s primarily useful for manual debug sessions or after changes to .env.
How much disk space does OpenClaw require?
The OpenClaw application itself requires roughly 150–300 MB including dependencies. However, total disk usage grows considerably over time due to logs, skill plugins, conversation memory files, and (if using Ollama) local model weights. The recommended minimum allocation is 5 GB to accommodate normal growth. A llama4:8b-scout model via Ollama consumes approximately 4.7 GB on disk. On storage-constrained systems, configuring log rotation in ~/.openclaw/config.yaml and periodically pruning unused models via ollama rm model-name keeps consumption manageable.
Can I run multiple OpenClaw instances on the same machine?
Yes, through port isolation and separate configuration directories. Each instance needs a unique project directory with its own .env file, a different port assignment, and distinct daemon identifiers. This is most commonly used by developers testing new skills or configurations without disturbing the production instance. Running separate Telegram bots for each instance is the cleanest way to distinguish them from the user’s perspective — each bot handles a different persona or task domain. Production use cases for multiple instances include running one personal assistant and one dedicated work assistant with entirely different AI models and permissions.
How do I uninstall OpenClaw if needed?
# Stop and disable the daemon
openclaw stop

# Remove the global npm package
npm uninstall -g openclaw

# Remove configuration and data (optional — deletes all memory and settings)
rm -rf ~/.openclaw
How do I connect OpenClaw to WhatsApp?
Run openclaw configure --channel whatsapp — a QR code appears in the terminal. Scan it via WhatsApp on the phone (Settings → Linked Devices → Link a Device). The session persists via a local session file. Add access control in .env with WHATSAPP_DM_POLICY=allowlist and WHATSAPP_ALLOW_FROM=+phonenumber to restrict which numbers can send commands. A re-scan is needed if the phone’s WhatsApp disconnects Linked Devices (typically after 14 days offline).
What is ClawHub and how do I install OpenClaw skills from it?
ClawHub is the official plugin registry for OpenClaw — comparable to npm for Node.js packages but specifically for AI agent skills. Install the CLI with npm install -g clawhub@latest, search for skills with clawhub search "keyword", and install with clawhub install username/skill-name. Skills live in ~/.openclaw/workspace/skills/ and load automatically. Always preview a skill with clawhub show username/skill-name before installing — skills execute with OpenClaw’s full system permissions, so reviewing the SKILL.md for untrusted authors is important.
How do I run the openclaw doctor diagnostic?
Run openclaw doctor in the terminal while the agent is running. It checks Node.js version, daemon health, gateway reachability, AI model response time, and messaging channel configuration — all in one command with clear pass/fail output per item. For post-upgrade compatibility checks, run openclaw doctor --config which additionally validates that .env and config.yaml are compatible with the installed version. It’s the fastest first step before digging into logs.
Is OpenClaw better than AutoGPT for local AI?
They solve different problems. OpenClaw is messaging-native (WhatsApp, Telegram, Discord) and built for persistent, always-on personal assistance that runs fully offline with Ollama. AutoGPT is designed for autonomous multi-step task pipelines executed in a terminal — it requires OpenAI’s API for core intelligence, meaning all prompts go to the cloud. For users who want a truly private, locally-run assistant accessible from a phone via WhatsApp without ongoing API costs, OpenClaw is the stronger choice. For developers building complex autonomous coding or research pipelines where terminal interaction is acceptable, AutoGPT has a more mature plugin ecosystem for those specific workflows.
The path from first install to a capable, always-on AI assistant is shorter than most users expect. The three platform-specific sections above cover the most common paths, the post-install configuration establishes the connection to an AI model and messaging channel, and the troubleshooting section handles virtually every failure mode encountered in practice.
Teams and individuals who engage deeply with the tool discover workflows far beyond basic command execution. Exploring the full range of future of AI agents developments shows just how rapidly this space is evolving — and OpenClaw’s architecture positions it well to adopt new model capabilities as they emerge.
For the next step, consider connecting a second messaging platform, exploring the ClawHub skill library for ready-made automations, or configuring a local Ollama model to achieve fully offline, zero-cost AI operation. The initial investment in getting the installation right pays dividends across every workflow built on top of it.